

System Requirements for Joomla 3.x
- Database − MySQL 5.1 +
- Web Server −
- WAMP (Windows)
- LAMP (Linux)
- XAMP (Multi-platform)
- MAMP (Macintosh)
- Nginx
- Microsoft IIS
- Operating System − Cross-platform
- Browser Support − IE (Internet Explorer 7), Firefox, Google chrome
- SSL (Secure Socket Layer) − A valid security certificate is required for HTTPS
- PHP Compatibility − PHP 5.4+ or PHP 5.3.10+
Download Joomla
When you open the link http://www.joomla.org/download.html, you will get to see a screen as below −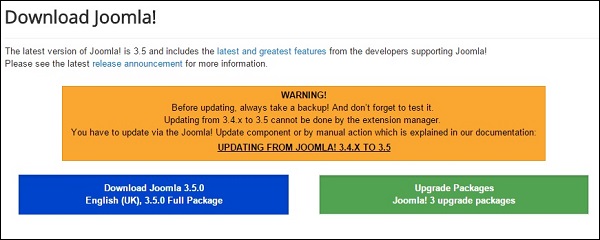 Download the Joomla zip file from the official site or if you want to
update the files of your previous version, then click on Upgrade
Package option.
Download the Joomla zip file from the official site or if you want to
update the files of your previous version, then click on Upgrade
Package option.Create Store Database
- Joomla requires MySQL database. So create a new empty database and user/password (for e.g. User as "root" and password as "root" or else you can set as per your convenience) for Joomla.
- After following the above step, you can continue with the installation process.
SetUp Wizard
It's very easy to set up Joomla into your system. The following steps describe how to setup Joomla locally on your system.Step (1) − Extract the downloaded Joomla folder and upload it on your web server or localhost.
Step (2) − Open your browser and navigate to your Joomla file path, then you will get the first screen of the Joomla installer as shown in the following screen. In our case the path is localhost/< Your_joomla_folder >.
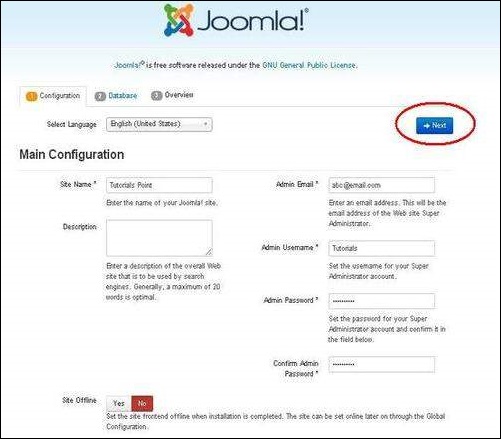 It contains the following fields −
- Site Name − Enter the name of the site which you are going to create in Joomla.
- Description − Add a small description about your site.
- Admin Email − Enter your email address which helps to recover our password or any update.
- Admin Username − Enter the username as per your choice while logging into Joomla.
- Admin Password − Enter password to protect your site.
- Site Offline − It specifies whether your site should be offline or online after completion of installation by clicking on Yes/No.
Step (3) − Here, you have to enter the information about the MYSQL database as seen in the screen below.
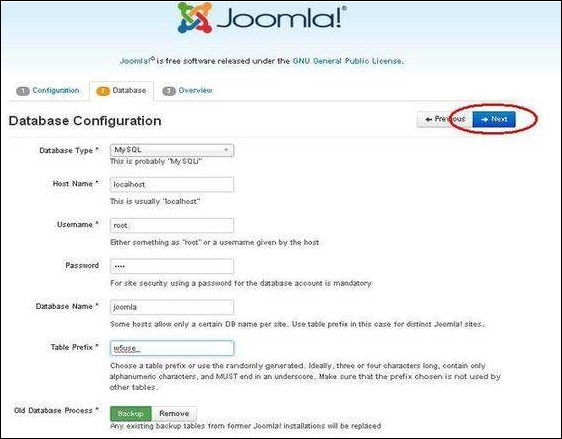
- Database Type − Select your database type. By default it will be MySQLi.
- Host Name − Write the host name by default it will be localhost.
- Username − Enter the user name of your MySQL database.
- Password − Enter the password which you had set for MySQL Database.
- Database Name − Enter the database name which you have created in MySQL database for Joomla.
- Table Prefix − It is used to add prefix in the database tables which helps to run multiple sites on the same database. It takes the default value.
- Old Database Process − It gives two options Backup or Remove. If you had already created a database then you can either remove it or select the backup option to create a backup of your whole database information.
Step (4) − In this step, you will be on last page of the installation process.
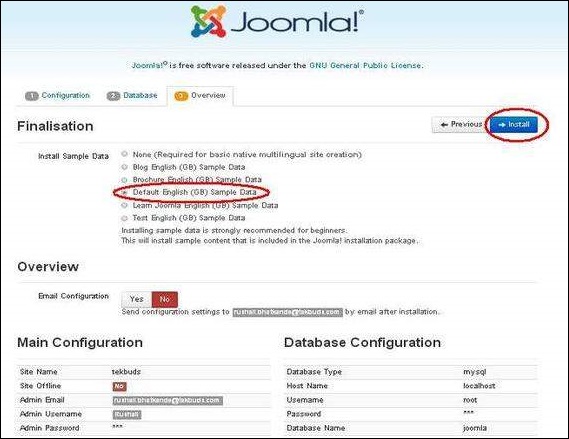 Here you can view all the information added to Joomla.
Choose Default English (GB) Sample Data as an example to build your website and click on Install button.
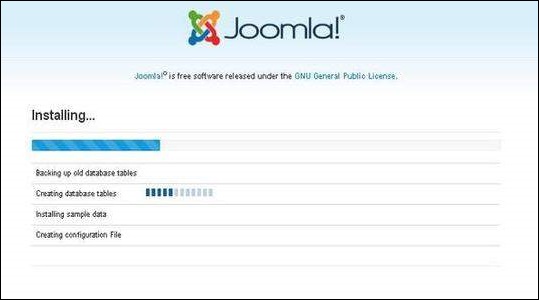
Step (5) − Next, you can see that Joomla starts the installation process on your machine.
 Step (6) − After a few minutes, after installation is successful and you will get a screen of the Joomla web installer as shown below.
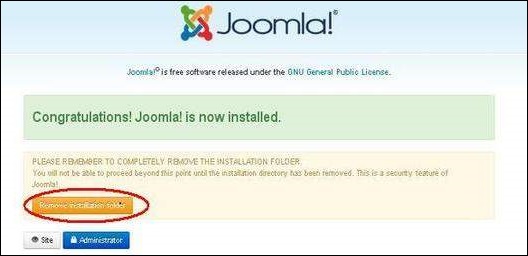 Next, click on the "Remove installation folder" button which will
help you to protect your site, so that no other person can re-install
your site.
Next, click on the "Remove installation folder" button which will
help you to protect your site, so that no other person can re-install
your site.Note − If your installation gets stuck and does not get completed for more than an hour, then do some changes as shown below.
Go to Joomla folder → installation → sql folder → mysql folder Open joomla.sql file and find the following term: "ENGINE=InnoDB". Replace this term with "ENGINE=MyIsam" and save the file.
Before MySQL 5.5.5, MyISAM is the default storage engine. (The default was changed to InnoDB in MySQL 5.5.5.)
Then your installation will begin.
Admin Panel
After installing Joomla you are able to login to your Joomla Admin Panel as described below −Step (1) − To access Joomla administrative panel, open the browser and type the URL as http://localhost/ < Your_joomla_folder >/administrator/index.php, then you will get the screen as shown below −
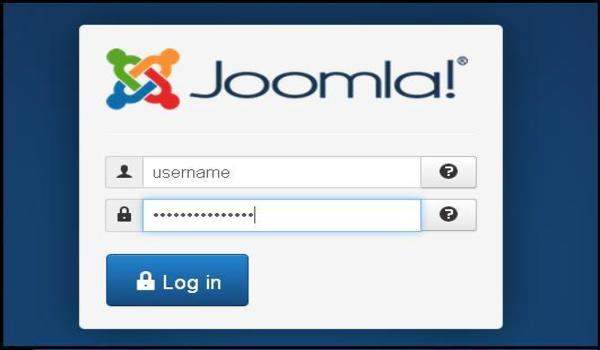 Step (2) − Enter the username and password which you had
mentioned during installation as shown in the step 3 of Set Up Wizard
section and click on the login button.
Step (2) − Enter the username and password which you had
mentioned during installation as shown in the step 3 of Set Up Wizard
section and click on the login button.
Post a Comment